Thursday, July 25, 2013

Home Canning: Chicken Stock

Mr.B & EJ recently butchered 8 chickens.  I immediately placed two in the stock pot providing me with 8 cups of deboned, shredded chicken and 9 3/4 quarts of homemade chicken stock.  Too many times I have witnessed the cook pouring the leftover stock down the drain because they didn't have room in their freezer to store it and didn't know how to can it, OR the worst, didn't think to keep and use it at all.
 
Home canning is not complicated.  It only requires the proper equipment and a little bit of time.  The basic equipment needed for home canning includes:   canning jars (various brand names include Mason, Kerr, Atlas, Ball), lids & bands for the jars, a water bath canner and/or a pressure canner (dependent upon what you choose to can), a jar funnel, and jar lifting tongs.  I also suggest obtaining a copy of the Ball Blue Book of Preserving.  Since chicken stock is a low acid food, a pressure canner is required. 


 Step 1:  As mentioned in other food preservation posts, choose a quick and easy supper, like Pioneer Woman's open faced Green Chili Enchiladas - 15 minutes from start to eat.  Click HERE for the recipe.  Note - the tomatoes and avocado chunks are my own addition because, well, I am just that way.

Step 2:  Grab the broom and dust pan so you can clean up the broken canning jar you will most certainly drop onto the basement floor, like I did.
 
Step 3:  Because the canning jar shattered into tiny shards, you will also have to vacuum the throw rug.
 
Step 4:  Sterilize your canning jars.  I choose to use my dishwasher but you can also place them in the sink and cover them with boiling water.
 
 Step 5:  Place your sterilized jars, open end down, on a CLEAN dish towel.

 Step 6:  Measure and fill your pressure canner with water according to your manufacturer's directions.  Mine requires 3 quarts.  Adding a small amount of white vinegar will help prevent mineral deposits on the outside of your jars.  Turn the heat on medium so the water in the canner begins to heat up.

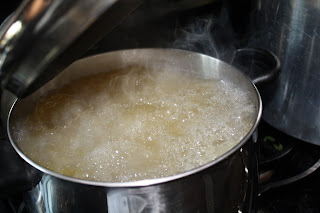
 Step 7:  In a large stock pot, bring your chicken stock to a full rolling boil.

 Step 8:  While your stock is coming up to a boil, fill your sink with HOT water and add your canning jars, bands and lids.  I use my tea kettle to get it really hot.  See the steam?

 Step 9:  Once the stock is boiling, fill your hot jars with hot stock to within 1/2 inch of the top.  Your jar tongs will assist you in removing the jars from the hot water.

 Step 10:  Wipe the edge of your canning jar to remove any excess drips.

 Step 11:  Place the lid on the cleaned jar.  Always use NEW lids.  Never try to reuse them.

 Step 12:  Screw the band on.  The band only needs to be hand tight.

 Step 13:  Use the jar tongs to lift the jar into the canner - it's hot.

 Step 14:  Repeat steps 9 thru 13 until your canner is full.  My canner will hold 7 quarts.

Step 15:  Turn the heat up to high.  Once the steam valve has popped up, add the weight and bring the pressure up to 10 lbs.  For chicken stock you will have to maintain 10 lbs. pressure for 25 minutes.  If the pressure gage moves over 11 or 12 lbs., reduce the heat - being careful not to allow the pressure to drop below 10 lbs.
 
Step 16:  Once your timer rings, you will turn the heat off and allow the canner to sit on the stove until the pressure gage reads 0 lbs.  For safety reasons, do not attempt to open the canner until the pressure levels have reached 0
 
Step 17:  Using your jar tongs (jars are still hot) move the jars to a clean towel and allow them to cool.  As they cool you many hear a few "pings".  This is normal and indicates your jars making a tight seal.  Once the jars are cool, use your thumb to rub the center of the lid.  If the lid "pops", you will have to re-can the broth.  If there is no movement or sound your jars have sealed properly.
 
Step 18:  Label your jars with the contents and date.  Store them in a cool dry place for up to one year.

Lastly please do not let the below disclaimer scare you away from home canned foods.  I and all my extended family have been eating home canned foods for generations and no one has ever become ill.  However, I believe it is important everyone is aware of the following safety precautions:
To prevent unwanted bacteria and food spoilage, always make sure your equipment and canning area is very clean.  If your home canned foods ever loose the seal, contain any mold or other signs of spoilage, do not consume it. Securely discard the spoiled food and the jar, lid and band - do not feed it to animals.  Do not reuse the jar, lid or band. 
If, by chance, you or anyone else, exhibit food poisoning symptoms after consuming home canned foods, go to the nearest emergency room immediately.  Tell the medical staff you have been eating home canned foods and need to be tested for botulism.  It is imperative you request a botulism test because if left untreated botulism is fatal.

Wednesday, July 17, 2013

Freezing Homegrown Greens: 9 Easy Steps

Every year the very first veggies ready for harvest from our garden are always English peas and greens.  I prefer to preserve my greens by freezing them.   I like the taste and texture of frozen over canned.  Today, I am preparing spinach but you can use this same method for any type of greens - mustard, Swiss chard, kale, turnip or beet.


Step 1:  Plan an easy and or quick supper recipe. If you have a large harvest, you will be tired at days end and will most likely not feel like spending a second longer in the kitchen than you have to.   I chose beef tips with onions and mushrooms prepared in my crockpot.  I served a salad and creamed peas along side, very easy and an efficient multi-tasked use of my time. 


Step 2:  Harvest your greens and set get them into your kitchen near your sink.


Step 3:  Bring a large pot of water to a full rolling boil.


Step 4:  Remove the edible leaves from the tough stems and place the leaves  in a sink full of COLD water.  Swish the greens to remove all the dirt.  Allow the greens to sit for 10 - 15 minutes so the dirt specks can sink to the bottom of the sink.  Your greens will float above the dirt. (NOTE:  do not fret if your harvested greens begin wilting before you have finished cleaning them.  The cold water will "shock" them right back to the crisp freshness you harvested hours ago.  I've even held them in a cool place overnight and "shocked" them back to freshness the next day.)


Step 5:  Remove the greens to the other side of the sink and rinse the wash sink.  Refill the wash sink with COLD water and repeat step 3.  A second wash will remove any remaining grit from the greens.
 

 Step 6:  Place washed greens into pot of boiling water and give it quick stir.  Cook for  2 minutes, do not overcook.


Step 7:  Using a slotted spoon or spatula transfer the hot greens to a tub of COLD water to stop the cooking process.


 Step 8:  Again, using a slotted spoon or spatula transfer the greens to a colander to drain.  Allow them to sit for 30 minutes, occasionally smashing out excess water.


Step 9:  Place drained greens into freezer bags, squeezing out any excess air and freeze.  I like to freeze ours in quart sized bags which will hold two pounds each.  Today, I placed 17 1/2 pounds of homegrown spinach in our freezer.

Saturday, July 13, 2013

The Town Pool


I have officially lost the race for "Mother of the Year", yet again.  Not until I picked OG and EJ up from the town pool this afternoon did I realize that this was EJ's very first visit to a community swimming pool.  Until today, he's always swam in private or hotel pools. 
Still waiting on EJ to emerge from the boy's dressing/shower room, OG hopped into the truck. 

Giggling she said, "EJ is so funny.  When we arrived he started to undress right in boys' side hallway near the front door.  I asked him, what are you doing?"  He replied, "I'm putting on my swim clothes."  "I told him he needed to go around the corner to do that."

Next, as we were driving home EJ recounts his dressing/shower room experience as he's leaving the pool.  He says, "Yeah, right after I got naked and was showering - why don't they have curtains or doors on the showers? - Gavin walked in and saw me and you should have seen the look on his face!" 

OOPs! I've failed to inform my son that the town pool showers are to rinse off your swim clothes BEFORE and AFTER swimming.  Not to actually shower and wash your hair.  After, explaining the PROPER use of the town pool showers room, EJ responds with, "OH! that's why there wasn't any soap or shampoo in there."

I suppose, since he is the caboose, I tend to assume he just  knows certain things - like how to use the town pool.

Red, Juicy, Sweetest Ever Strawberries

Last year's garden splurge was a strawberry pyramid complete with bird netting and 50 strawberry starts.  Our starts established themselves well last year and this summer we are enjoying the sweetest, juiciest strawberries EVER!  These strawberries are so sweet even Mr.B is eating them and in all the years we've been married I've only seen him eat 2 strawberries before this summer.  He says the store bought berries are a little sour for  his taste.  Which makes sense because of packaging and shipping strawberries must be picked before fully ripe so that grocers do not have spoiled berries on their produce shelves.  However, these homegrown berries are left on the vine until the green blossom top begins to turn red - VERY ripe and outrageously sweet!
We absolutely plan to purchase more strawberry towers for the future.

Delicious strawberries ripening to sweet perfection.
 

Our 1st batch ... Gone in 60 seconds.

Friday, July 5, 2013

"I Just Don't Understand How That Always Happens"

Those were JP's words last night while we were in Medora watching the July 4th fireworks display when I was suddenly drenched by a very forceful lawn sprinkler.  Yes, we were sitting on our blanket relaxing and enjoying the cool night air and the beautiful array of fireworks lighting up the clear night sky when I, and only I, was doused.
The night before we were enjoying the stars and fireflies while relaxing in our hot tub.  I became too warm and attempted to sit on the edge - as everyone else in our family does when they get too warm.  However, I suppose I plopped myself too far out and before I knew it my feet tumbled over my head and I crashed to the deck - pulling all the  muscles in the front side of my left shoulder. Excruciatingly painful.
Yes, I am a klutz and a Murphy's Law magnet. I am the one the bird poo drops on while picnicking, I'm the one who trips and falls for no apparent reason while walking down the sidewalk, I'm also the one who seems to always get a dribble of food or drink on my blouse when eating.   My family often shakes their heads wondering how all these "incidents", some harmless others injurious,  happen to me, and only me, in our family.  Yup, this week has left JP stating, yet again, "I just don't understand how that always happens".